Update February 2024: Most of the contents of this article can now be achieved with this Burp plugin that I wrote: https://github.com/honoki/burp-digitalocean-droplet-openvpn – make sure to give it a spin!
When performing security tests, you will often be required to send all of your traffic through a VPN. If you don’t want to send all of your local traffic over the same VPN, configuring an easy-to-use setup can sometimes be a pain. This post outlines one possible way of configuring Burp Suite to send all its traffic through a remote VPN, without having to run the VPN on your own machine.
In this guide, I will describe a setup that makes use of the following tools. Note, however, that most of these can be replaced by similar tools to accomplish the same goals.
- Burp Suite
- PuTTY
- OpenVPN running on a Virtual Private Server (VPS)
- A second VPS as a jumphost (not required if you have a static IP)
- Browser extension Switchy Omega in Chrome or Firefox
Why?
There are a few reasons why configuring a VPN to execute your security tests may be a good idea:
- Testing assets that are not publicly available, e.g. located on an internal network; this is often the case when performing internal infrastructure tests or tests against UAT environments;
- Testing public assets from a whitelisted environment, e.g. web applications that are usually hidden behind a WAF, applications that are internet-accessible, but only available to a number of whitelisted networks, etc;
- Bug bounty programs that require the use of their VPN as a condition to participate in the program.
To accommodate this need, you may be inclined to install an OpenVPN client on your local testing machine and get going. While this definitely works, I found that separating my testing activities from other network activity is not only a privacy-conscious decision, but also helps towards freeing up as much of the VPN bandwidth as is possible, because now it is no longer occupied with superfluous traffic.
The setup
Architecturally, the solution that I will describe looks like this:
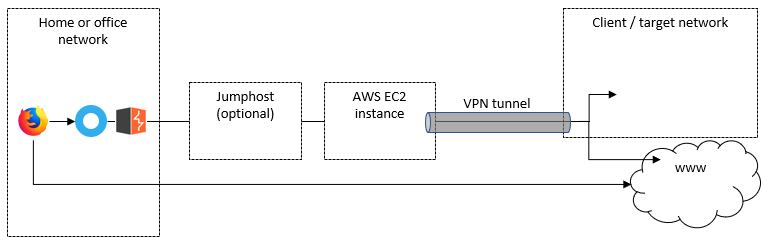
VPN tunnel
The VPN tunnel is of course the core of this setup, and will allow you to tunnel your (selected) traffic either towards assets inside a target’s environment, or towards internet-accessible assets, but originating from the target’s network. In other words, the web applications you are testing will see you coming from Target X’s IP address range, rather than from your own.
Jump host
If you have a static IP on your home or office network, or this is intended as a temporary setup (i.e. your current IP will do), you can skip this.
Otherwise, this jump host will serve as a bridge towards your VPN-connected EC2 instance. Most importantly, the VPS’s static IP will allow us to configure the traffic to and from this jump host to avoid being sent over the VPN.
On this jump host, make sure you have access to the EC2 instance’s private key (if applicable), and set up a SOCKS proxy using the following command:
ssh -i ~/ssh-private-key.pem -D 2222 [email protected]
This will set up an SSH tunnel that will redirect all traffic proxied through port 2222 on the jump host, towards the original destination via the AWS EC2 instance (i.e. through the VPN when the VPN is activated).
AWS EC2 instance
Because it’s cheap, I opted for a t2.micro instance in AWS EC2 to set up the connection with the VPN. I am a fan of Debian, so I spun up an Ubuntu 18.04 image. Once up and running, you will need the following configured:
- Install OpenVPN;
- Upload the ovpn file containing the config of the VPN you want to connect to;
- Whitelist your jump host (or home/office IP) from the VPN by directing traffic through the usual gateway (source);
- Whitelist any local DNS servers if needed;
# install OpenVPN client
sudo apt install openvpn

# find out and write down your local gateway's IP address
netstat -anr

# find out and write down your local DNS servers' IP addresses
# (I needed this to allow DNS resolution in AWS EC2 when the VPN is running)
systemd-resolve --status

# Make sure both IPs you wrote down are not redirected through the VPN:
sudo route add -host <your-jumphost-ip> gw <your-local-gateway>
sudo route add -host <your-local-dns-server> gw <your-local-gateway>

# Start the VPN!
sudo openvpn --config ./openvpn-config.ovpn --daemon
Local configuration
The final steps to get this to work are:
- Set up local port forwarding to the SOCKS proxy on your jump host;
- Configure Burp Suite to use the forwarded local port as a SOCKS proxy;
- Use the ProxySwitch browser extension to send only selected sites towards Burp Suite and through the VPN
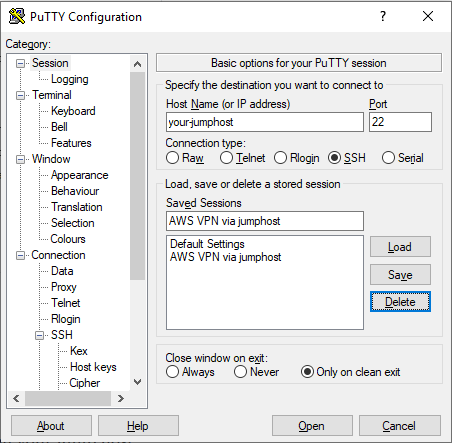
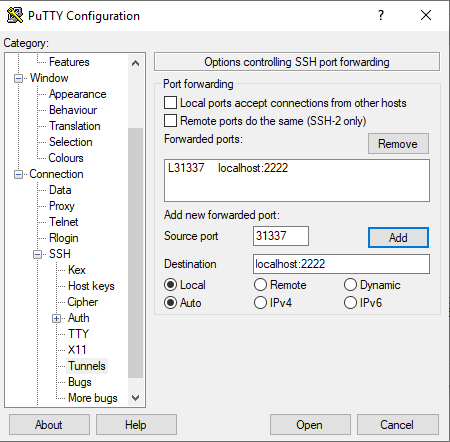
On Windows, using PuTTY, you can use the following configuration to forward local port 31337 to your jump host on port 2222:
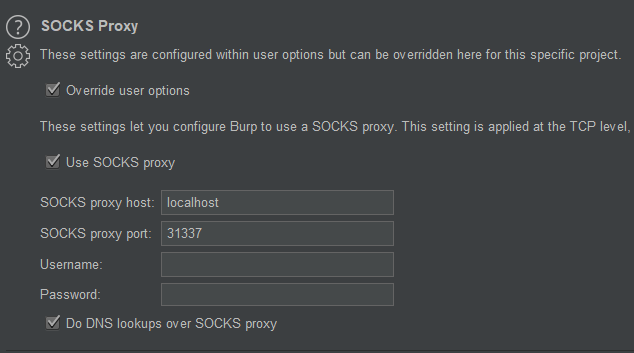
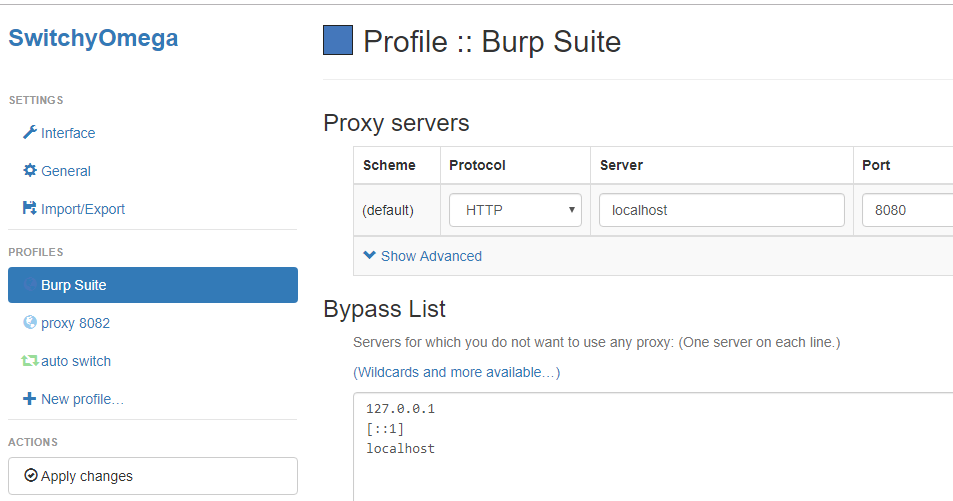
In Burp Suite, go to either User Options or Project Options, and configure SOCKS proxy to point to your localhost on port 31337:
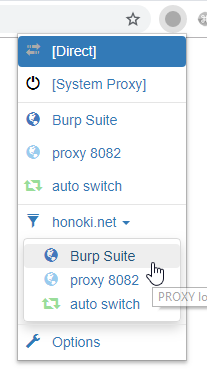
Finally, point your Switchy Omega to your Burp proxy for selected sites:
Before kicking off your tests, I recommend you verify the value of your public IP that is displayed when browsing to a site like ifconfig.co or ipchicken.com with your proxy enabled.
Pros / cons
The described setup has a few (dis)advantages worth mentioning:
Pros
- Reserve the VPN bandwidth to testing activities only, which can considerably improve your connection speed over a sometimes shaky VPN;
- Separate your “background” network traffic from the VPN traffic, ensuring your privacy isn’t at risk when testing from your personal device;
- The AWS EC2 instance can be shut down in-between tests, ensuring your bill doesn’t keep growing overnight;
- You can configure multiple devices to connect through a single VPN connection by pointing them to the same SOCKS proxy on the jump host.
Cons
- The setup is slightly more convoluted than just running your OpenVPN client on your local machine;
- In case of a failing VPN connection on the AWS EC2 instance, you may be executing tests outside of the VPN-ed environment without you noticing;
- When configuring per-domain proxy settings, web application traffic that hits other domains will not be proxied, possibly leading to unexpected results.
I’d love to hear your thoughts on this! Did you use a similar approach? Do you have suggestions to improve or simplify this setup? Let me know in the comments below.
How is it different from using opevpn on localhost and doing this.
This set-up was intended mostly for compliance when testing specific applications/environments. By not running OpenVPN on your localhost, you ensure that *only* your web traffic (that you manually pointed to go through Burp) will go through the VPN, and not all your other traffic.
And also, how do I check if the vpn is working fine and hiding my identity?
The same way you would do that with a local setup: browse to a site that displays your IP, tell the browser to use Burp as a proxy and refresh the page. The displayed IP should be that of the OpenVPN server you are using.
I’m also wondering what is the reason for all this. If using Linux, you could set which IP range should go through which interface, essentially separating VPN and non-VPN routes from each other.
While that’s true, you’re also answering your own question: not everybody uses Linux, and not every engagement provides a list of IP ranges in scope. Also, in case an application runs behind a shared infrastructure (Cloudflare, Amazon, …), routing IP traffic might not be as desirable as routing traffic based on domain names.
how do I sniff iOS device traffic while my MACBook is running Burp Suite and connected over ssl vpn using f5?
What about running it on one of your local boxes ?